
Keyboard & Mouse Recording
Keyboard & mouse recording is the most common output type: record a sequence of key and mouse actions once, and The Link replays it whenever the Link's input (a pose, voice command, touch zone, etc.) is triggered.
Remember to switch to an English input method before recording.
Interface
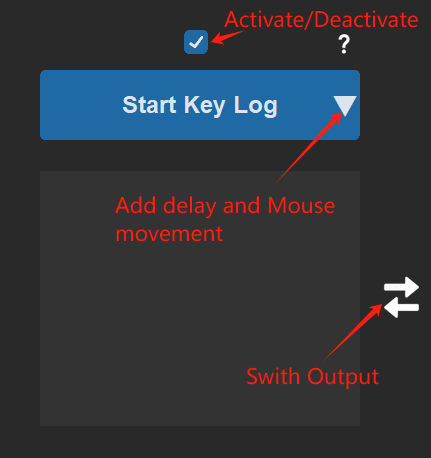
- Start Key Log: the recording button. While recording it turns into ←Delete — click it to remove the last element on the timeline (a keycap or a badge alike).
- Recording strip: the grey area under the button. Everything you record shows up as a row of keycap chips — every press/release, every delay (stopwatch chip) and every mouse-movement badge is its own tile on the timeline.
- Double-click any chip to edit it directly (change the key, the delay seconds, or the mouse-movement values).
- Drag chips to reorder them.
- Right-click a chip for a menu to delete or edit that element.
- Behavior dropdown: below the strip, available once something is recorded (Execute Once / Hold / Trigger & Release / Spam), see below.
- ▽ output menu: a cyan outlined triangle sits just outside the right edge of the recording frame. Hovering it opens the output menu (hovering the Start Key Log button opens it too).
How to Record
- Click Start Key Log. The button changes to ←Delete and recording is armed.
- Move your cursor over the grey recording area. Capture only happens while the cursor hovers the grey area — every key and mouse press and release is recorded as a keycap chip.
- Made a mistake mid-recording? Click ←Delete to drop the last tile.
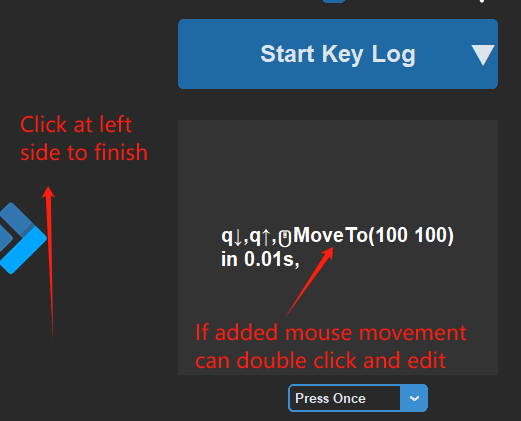
- Click anywhere outside the recording frame to stop recording.
- You can keep polishing afterwards: double-click to edit, drag to reorder, right-click to delete.
The ▽ Output Menu
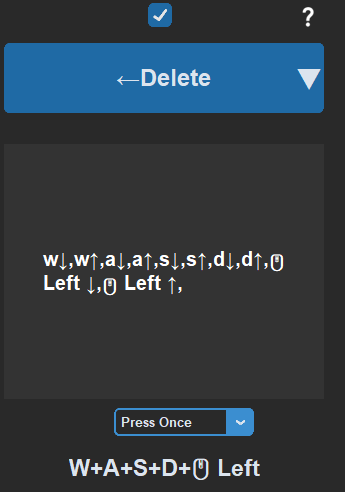
Hovering the triangle (or the Start button) opens a menu with six rows:
- Add Mouse movement: insert a mouse movement into the timeline, see below.
- Add Delay: insert a wait into the timeline, see below.
- Body-Mouse Sync: drive the mouse directly with your body, see Body-Mouse Sync.
- Page & Link Control: use this Link to toggle pages or other Links, see Page Toggle and Link Toggle.
- Fullscreen Recording Mode: fullscreen recording with real time intervals, see below.
- Add Other System Control Commands: add system-level control commands.
Adding Delay
A delay between different key presses
Pick Add Delay from the ▽ menu, enter the seconds (0.1 by default) and confirm. A stopwatch chip appears on the timeline; like any other chip you can drag it to where you need it and double-click it to change the duration.
Hold a key for a set time
Some games require a key to be held for a specific duration. To insert a delay between that key's press and release:
- While recording, press the key you need to hold
- Switch the behavior to Hold
- Use the ▽ menu to Add Delay
- Switch the behavior back to Execute Once
If the whole sequence needs its real-life rhythm preserved, it is easier to use Fullscreen Recording Mode (below), which records the actual time interval between every action automatically.
Adding Mouse Movement
Pick Add Mouse movement from the ▽ menu and choose one of the two tiles: Relative Movement or Absolute Position. The main window then minimizes and a fullscreen capture overlay appears — you act directly on your real screen:
- Relative Movement: press and drag a distance; the direction and distance of that drag are recorded (default duration 0.5 s).
- Absolute Position: click a spot on the screen; the mouse will be moved to that fixed position (default duration 0.2 s).
A mouse-movement badge then appears on the timeline; double-click it to edit X, Y and the duration.
The Four Behaviors
The behaviors work together with Similarity — worth reading alongside this page.
Execute Once
When your pose is recognized with high similarity (e.g. 99%), the recorded actions run once.
Hold
While you maintain the pose the key stays held down, and is released when the pose ends.
About holding multiple keys:
- If you record several keys pressed together and released together, choosing Hold will hold all of them.
- If you pressed the keys one after another, choosing Hold only holds the last key.
Trigger & Release
Trigger & Release has two halves: the first half runs when the pose triggers, the second half runs when you no longer hold the pose. A  loop-marker chip on the timeline separates the two halves (it cannot be dragged or deleted).
A simple example: raise both hands in front of you to open the map (press M), lower them and M is pressed again to close the map.
You can also edit what comes after the marker — delete the second M and replace it with any other actions, so triggering and un-triggering do completely different things.
For more about triggering and no longer holding a pose, see Pose Recognition.
Used cleverly, Trigger & Release can achieve many unexpected effects.
Spam
While you hold the pose, the recorded commands loop continuously — like spamming a key. In Spam mode the timeline starts with a 💥 marker chip.
Spam + relative mouse movement
When you add a Relative Movement and use Spam, the effect is the mouse continuously moving in one direction. If the duration is at the minimum 0.01 the movement is too fast and looks choppy; increasing the duration smooths it out but adds inertia, so adjust in small steps. The X and Y values set the speed (magnitude) and direction (sign) of horizontal and vertical movement.
Advanced Output Mode (Expand output)
The button in the bottom-right corner of the editor expands the output: the single recording frame becomes two stacked frames — Link triggered and Link no longer triggered — each with its own record button and ▽ menu. You can author two completely independent sequences for "on trigger" and "on un-trigger", with more freedom than Trigger & Release. Click it again (Collapse output) to return to the single frame.
Fullscreen Recording Mode (F10 / F12)
Pick Fullscreen Recording Mode from the ▽ menu (keyboard & mouse mode only) and a fullscreen recording surface appears:
- Press F10 to start recording. This mode records the real time interval between every action, and mouse clicks are recorded at their actual screen positions — ideal for reproducing a whole timed combo.
- Pressing F10 again while recording restarts the take (discards what this session captured and starts over immediately).
- Press F12 to stop and save; pressing F12 or Esc before anything is recorded cancels.
- On Mac, F10/F12 are usually system media keys — hold fn while pressing them, or use the on-screen buttons.
Switching Between Keyboard and Controller Mode
The mode button in the bottom-left corner of the editor (keyboard/controller icon) switches between keyboard & mouse mode and controller mode. This is a model-wide switch: all Links in the current model change together. The current mode's outputs are saved, so you can switch back at any time.
Stuck-Key Warning
If a key on the timeline has a press but no matching release (for example the cursor left the grey area before you released the key), clicking save pops a red warning: Output may leave a key stuck. Go back and fix the recording, or — if this is intentional (e.g. the release lives in the second half of a Trigger & Release) — click Continue anyway to save.
Other Issues
Keys not responding in game
- Make sure the output is going to the game window — sometimes you simply forgot to switch back to the game after recording.
- The Link's hardware driver may not be installed correctly. Try reinstalling the driver and restarting your computer.
- In rare cases some software conflicts with The Link. Try closing other programs running in the background.
About the Ctrl key
- The in-game hotkey for interacting with the overlay is Ctrl by default (either side works), and it is rebindable under Overlay Setup → In-game overlay interaction hotkey — see Overlay Setup. If your game uses Ctrl heavily, the easiest fix is to rebind the overlay hotkey.
- A plain Ctrl recorded in the timeline is emitted as Right Ctrl. Most games don't distinguish the two sides; if your game binds "Left Ctrl" specifically, rebind it in the game to a side-neutral Ctrl or to Right Ctrl.
A key only recorded its press, not its release
- Recording only captures while the cursor hovers the grey area — if the cursor slipped out before you released the key, only the press is recorded (saving will then trigger the stuck-key warning above).
- Some software or Windows shortcuts may conflict with The Link's recording.
- The software targets standard keyboard layouts; special keyboards such as the Apple Magic Keyboard, Dvorak, or some non-English layouts may not be fully recognized.